
Git is a version control system that is widely used in the tech industry for tracking changes in software projects. As a DevOps professional, it is essential to have a strong understanding of Git in order to effectively collaborate with your team and manage code deployments. In this tutorial, we will provide a quick overview of the most important Git concepts and commands, so you can get up and running with Git in no time. By the end of the Git for DevOps tutorial, you should have a solid foundation for using Git in your daily work as a DevOps professional. Let’s get started!
What is Git
Git is a version control system that is used to track changes to files. It is commonly used in software development to keep track of the different versions of code that are being worked on by multiple developers. With Git, developers can work on the same codebase at the same time without overwriting each other’s changes. Git also allows developers to easily switch between different versions of the code, which can be useful for debugging or reverting back to a previous version. Essentially, Git helps developers to keep track of the history of their code and to collaborate with other team members more effectively.
Git architecture
Git has a client-server architecture, which means that there is a central server that stores copies of the code repository and developers can access this repository from their own computers using a Git client. When a developer makes changes to the code, they commit these changes to their local repository, which is a copy of the code repository stored on their own computer. Then, the developer can push these committed changes to the central server, which updates the central code repository with the new changes. Other developers can then pull these updates from the central server to their own local repositories, keeping their copies of the code up to date with the latest changes.
One of the key benefits of Git’s client-server architecture is that it allows developers to work offline and commit their changes locally, which can be faster and more convenient than constantly pushing and pulling changes from the central server. It also allows multiple developers to work on the same codebase simultaneously, as long as they are committing their changes to different parts of the code. This makes Git a very useful tool for collaborative software development.
Git Commands
Here are some of the most commonly used Git commands:
-
git clone: This command is used to create a local copy of a remote code repository. For example, if you want to work on a project that is stored on a Git server, you can usegit cloneto download a copy of the code to your own computer. -
git init: This command is used to initialize a new Git repository. It creates a new directory that contains all of the necessary Git files and directories for version control. -
git add: This command is used to stage changes for a commit. When you make changes to your code, you need to usegit addto tell Git which changes you want to include in your next commit. -
git commit: This command is used to save your changes to the local repository. When you commit changes, you should include a commit message that briefly describes the changes you have made. -
git push: This command is used to send your committed changes to the central repository. This is how you share your changes with other team members and update the central codebase. -
git pull: This command is used to retrieve the latest changes from the central repository and merge them into your local repository. This is how you keep your local copy of the code up to date with the latest changes made by other team members. -
git branch: This command is used to create, list, or delete branches in a Git repository. Branches allow you to work on multiple versions of the code simultaneously, without affecting the main codebase. -
git merge: This command is used to merge the changes from one branch into another branch. This is often used to combine the changes made in a feature branch back into the main branch of the code. -
git diff: This command is used to compare the changes you have made to your code with the previous version of the code. It shows you a list of the lines that have been added, modified, or removed in your code. -
git stash: This command is used to temporarily save changes that you are working on, so that you can switch to a different branch or task without committing your changes. You can later apply the stashed changes to your code using thegit stash applycommand. -
git cherry-pick: This command is used to apply the changes from a specific commit to your current codebase. It allows you to selectively apply individual commits, rather than merging an entire branch.
Git development workflow
Here are the general steps for a Git development workflow using GitHub, with examples:
- Create a new repository on GitHub or use an existing repository. For example, you might create a repository called “myproject” on GitHub.
- Clone the repository to your local machine using the
git clonecommand. For example:
git clone https://github.com/myusername/myproject.gitThis creates a local copy of the code repository on your computer in a new directory called “myproject”.
- Make changes to the code on your local machine. For example, you might add a new feature to the code or fix a bug. Use the
git addcommand to stage the changes for a commit. For example:
git add myfile.py- Commit the changes to your local repository using the
git commitcommand. Include a commit message that briefly describes the changes you have made. For example:
git commit -m "Added new feature for calculating averages"- Push the committed changes to the central repository on GitHub using the
git pushcommand. This updates the central codebase with your changes and makes them available to other team members. For example:
git push origin master- If other team members have made changes to the code that you need to incorporate into your local repository, you can use the
git pullcommand to retrieve their changes from the central repository and merge them into your local copy of the code. For example:
git pull origin master- Repeat this process as you continue to make changes to the code and collaborate with other team members.
GitHub also provides a number of features for managing and reviewing code changes, such as pull requests and code reviews, which can be useful for larger teams and more complex projects.
Git Branching strategies
There are many different branching strategies that teams can use, and the best strategy will depend on the specific needs and goals of the project. Some common strategies include:
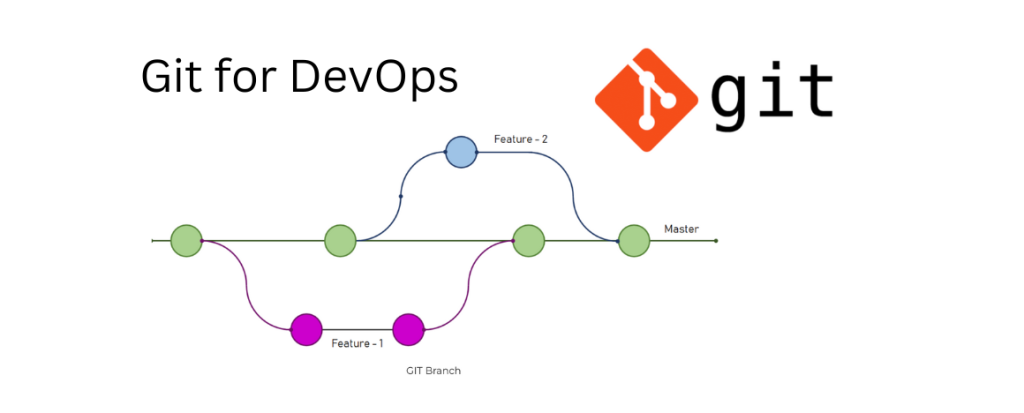
- Feature branching: In this strategy, developers create a new branch for each feature or change they are working on. This allows them to work on the feature in isolation, without affecting the main version of the project. When the feature is complete, it can be merged back into the main branch.
-
Gitflow: This strategy was developed by Vincent Driessen and involves using a specific set of branches for different types of work. The main branches are
master(for production-ready code) anddevelop(for code that is currently being worked on). Developers create a new branch for each feature or change they are working on, and these branches are merged back intodevelopwhen they are complete. When the code indevelopis ready for release, it is merged intomaster. - Trunk-based development: In this strategy, developers work directly on the main branch, or “trunk,” of the project. This allows them to continuously integrate their changes into the main branch and get feedback from the rest of the team. However, this strategy can be more challenging for larger teams, as it requires careful coordination to avoid conflicts.
Ultimately, the best Git branching strategy for your team will depend on the specific needs and goals of your project, as well as the size and structure of your team. It’s important to choose a strategy that allows your team to work efficiently and effectively, while also ensuring that the code is of high quality.
Git Feature branching strategy
In the Git feature branching strategy, developers create a new branch for each feature or change they are working on. This allows them to work on the feature in isolation, without affecting the main version of the project.
Here is an example of how you might use feature branching with GitHub, including the use of pull requests:
- Start by creating a new repository on GitHub or using an existing repository.
- Clone the repository to your local machine using the
git clonecommand. - When you are ready to start working on a new feature, create a new branch for the feature using the
git branchcommand. For example:
git branch newfeature
git checkout newfeature
This creates a new branch called “newfeature” and switches your working directory to the new branch.
- Make changes to the code on your local machine and commit them to the feature branch using the
git commitcommand. - When you are finished working on the feature, push the changes to the central repository on GitHub using the
git pushcommand. For example:
git push origin newfeature
- If you need to make further changes to the feature, you can continue to work on the feature branch and commit your changes as needed.
- When you are ready to merge the feature into the main branch of the code, switch to the main branch and use the
git mergecommand to combine the changes from the feature branch into the main branch. However, rather than pushing the changes directly to the main branch, you can create a pull request on GitHub to review and discuss the changes with your team before they are merged. To do this:
- Go to the GitHub repository page and navigate to the “Pull requests” tab.
- Click the “New pull request” button.
- Select the “newfeature” branch as the base branch and the “master” branch as the compare branch.
- Review the changes that will be merged and add any comments or feedback that you have.
- Click the “Create pull request” button to submit the pull request for review.
Your team members can then review the changes and discuss them in the pull request, and when they are ready to be merged, one of the team members can merge the pull request using the “Merge pull request” button. This will merge the changes from the “newfeature” branch into the main “master” branch and update the central repository on GitHub.
Using feature branching and pull requests can help you to collaborate with your team more effectively and ensure that code changes are reviewed and tested before they are merged into the main codebase. It can also make it easier to track and manage the different features that are being developed.
Git branches
Here are some common types of Git branches:
- Master branch: The master branch is the main branch of the code repository. It usually represents the production version of the code, and changes to the master branch are usually deployed to production environments.
- Feature branch: A feature branch is a branch that is created to develop a new feature or make changes to the code. Feature branches are used to isolate the development of new features from the main codebase, allowing multiple developers to work on different features simultaneously without affecting the main codebase.
- Release branch: A release branch is a branch that is created to prepare for a new software release. It is used to stabilize the code and fix any remaining bugs before the code is deployed to production.
- Hotfix branch: A hotfix branch is a branch that is created to quickly fix a bug or issue in the production version of the code. Hotfix branches are usually created from the master branch and are used to make emergency fixes that need to be deployed to production as soon as possible.
- Experimental branch: An experimental branch is a branch that is used to try out new ideas or technologies without affecting the main codebase. Experimental branches are often used to test out new features or approaches to see how they work before deciding whether to incorporate them into the main codebase.
These are just a few examples of the types of branches that you might use in Git. The specific branches that you use in your workflow will
Git merge strategies
There are several different strategies that can be used to merge branches, each with its own advantages and drawbacks. Some common merge strategies include:
- Fast-forward merge: A fast-forward merge is the simplest type of merge, and occurs when there are no changes in the target branch that conflict with the changes being merged in. In this case, Git can simply move the pointer of the target branch to the same commit as the source branch, effectively “fast-forwarding” the target branch to the state of the source branch. For example:
$ git merge feature-x
- Three-way merge: A three-way merge is a more complex type of merge that occurs when there are changes in both the source and target branches that conflict with each other. In this case, Git will create a new commit that combines the changes from both branches, creating a “merge commit” in the process. This can be done using the
git mergecommand with the-no-ffflag, which forces Git to create a new merge commit even if a fast-forward merge is possible. For example:
$ git merge --no-ff feature-x
- Squash merge: A squash merge is a type of merge that combines all the commits from the source branch into a single commit in the target branch. This can be useful for cleaning up the commit history and making it easier to understand. Squash merges can be performed using the
git mergecommand with the-squashflag. For example:
$ git merge --squash feature-x
- Rebase merge: A rebase merge is a type of merge that takes the commits from the source branch and “replays” them on top of the target branch, rather than creating a new merge commit. This can be useful for preserving a linear commit history, but can be more difficult to revert if something goes wrong. Rebase merges can be performed using the
git rebasecommand. For example:
$ git rebase feature-x
Ultimately, the best merge strategy for your team will depend on the specific needs and goals of your project, as well as the size and structure of your team. It’s important to choose a strategy that allows your team to work efficiently and effectively, while also ensuring that the code is of high quality.
Git Cherry pick
Git cherry-pick is a command that allows developers to apply specific commits from one branch to another branch. This can be useful for selectively applying changes from one branch to another, rather than merging the entire branch.
Here’s an example of how to use the git cherry-pick command:
- Checkout the target branch: The first step in the process is to checkout the target branch, or the branch that you want to apply the changes to. This can be done using the
git checkoutcommand. For example:
$ git checkout target-branch
- Cherry-pick the commit: Once you’re on the target branch, you can use the
git cherry-pickcommand to apply the specific commit you want to the branch. You can specify the commit using its SHA-1 hash. For example:
$ git cherry-pick eabcdef1
- Commit the changes: Once the commit has been applied, you can commit the changes to the target branch using the
git commitcommand. This will create a new commit on the target branch that includes the changes from the cherry-picked commit.
$ git commit -m "Cherry-pick commit from source branch"
This can be useful in a number of different situations, such as:
- When you want to selectively apply certain changes from one branch to another, rather than merging the entire branch
- When you want to fix a bug or issue in a specific version of the project, but don’t want to merge all the changes from the branch that contains the fix
- When you want to experiment with different approaches or approaches to a problem, and want to apply the changes from the best approach to the main branch
- When you want to incorporate changes from a branch that has been abandoned or abandoned, but don’t want to merge the entire branch
Overall, the git cherry-pick command allows developers to selectively apply specific commits from one branch to another, rather than merging the entire branch. This can be useful for selectively incorporating changes into a project, while still maintaining a clean and organized commit history.
Conclusion
In conclusion, Git is a powerful version control system that is essential for any Devops professional. By learning the basic Git concepts and commands, you can effectively collaborate with your team, manage code deployments, and track the history of your code.
Using Git effectively can help you to streamline your workflow, improve the quality of your code, and make it easier to work on complex projects with other team members. We hope that this tutorial has provided you with a solid foundation for using Git in your work as a Devops professional. With a little practice, you’ll be using Git like a pro in no time!